
AutoHano Works Guide
Even if this is your first time, just follow the steps in order — one click per step. Training samples are included, so you can try everything right away without your own files.
1. Install and start first time only
There is no installer. Unzip the download and double-click to start. Works runs on Windows 10 and 11.
What you need — even on a new PC, this is all
| Basics (everyone) | A Windows 10 or 11 (64-bit) PC, internet, and one Google, Kakao or Naver account. There is nothing else to install and no administrator rights are needed. Comparing files, Find address, the ladder view and reports work even on a PC without XG5000. |
|---|---|
| Asking an AI | Claude Desktop (download it from claude.ai/download; needs a Claude account), or a Claude or ChatGPT plan that can use connectors — chapter 6 |
| Generating .xgwx | XG5000 — if it is installed on this PC, Works copies it as it is. If not, the installer downloaded from the LS ELECTRIC website is enough. 8GB of free disk space; the first time may need administrator approval and a restart — chapter 7 |
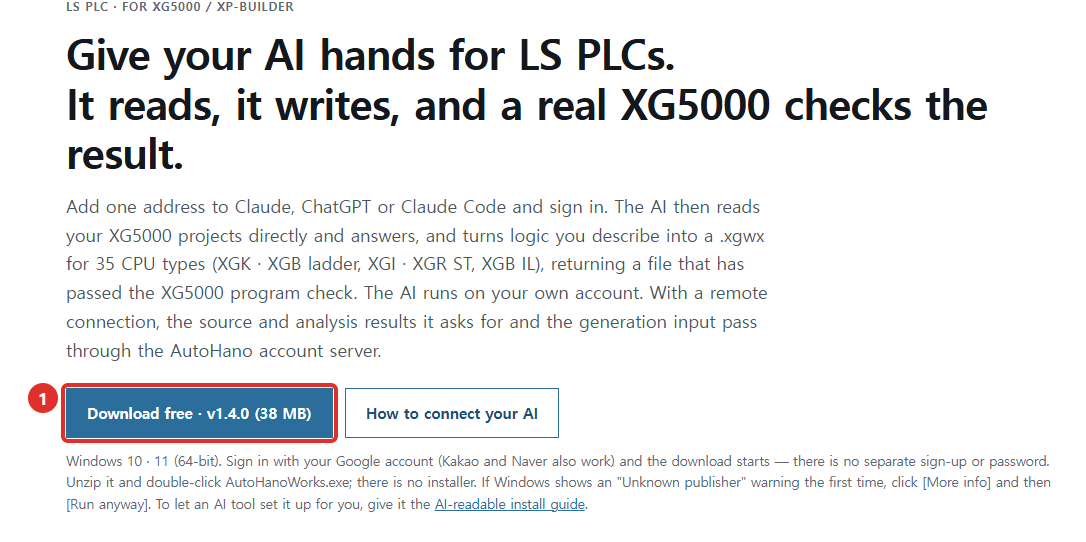
Click Download free
In your web browser, go to works.autohano.com and click Download free.
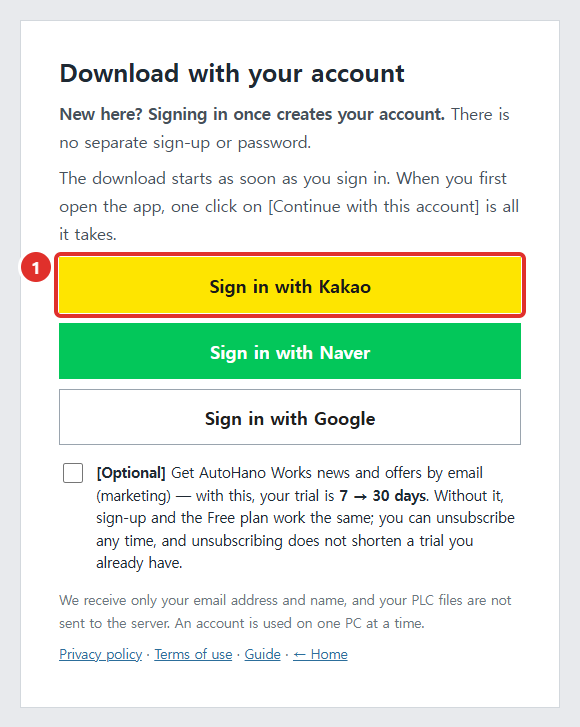
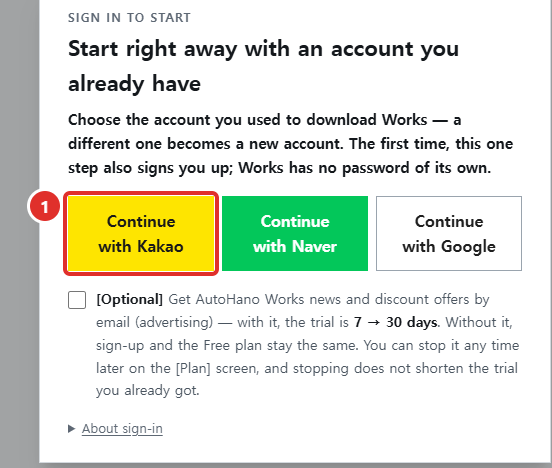
Choose your account — this is the sign-up
Click the account you use — Google, Kakao or Naver — and sign in as usual. If you are new, this one step creates your account. There is no separate sign-up and no password.
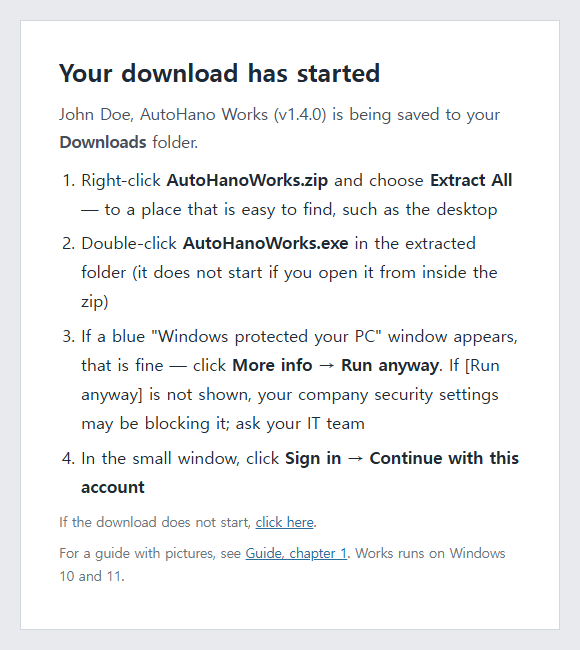
The file downloads by itself
AutoHanoWorks.zip is saved to your Downloads folder, and the page lists four next steps — the same as the steps below.
Extract the zip
Right-click the downloaded AutoHanoWorks.zip and choose Extract All. Extract it somewhere easy to find, such as the desktop.
A simplified drawing. The menu may look slightly different on your PC. If you use an archive program such as 7-Zip or WinRAR, Extract Here is fine too.
Double-click AutoHanoWorks.exe
In the extracted AutoHanoWorks folder, double-click AutoHanoWorks.exe, the one with the green icon. Do not delete or move the other files in the folder.
AutoHanoWorks.exeIf a blue warning appears, More info → Run anyway
The first time, Windows may show a blue window titled "Windows protected your PC". It means Windows does not know this new program well yet. Click twice as shown below and Works starts; Windows does not ask again for the same file.
Windows protected your PC
Microsoft Defender SmartScreen prevented an unrecognized app from starting. Running this app might put your PC at risk.
More info① Click the More info link.
Windows protected your PC
App: AutoHanoWorks.exe
Publisher: Unknown publisher
② Click the new Run anyway button.
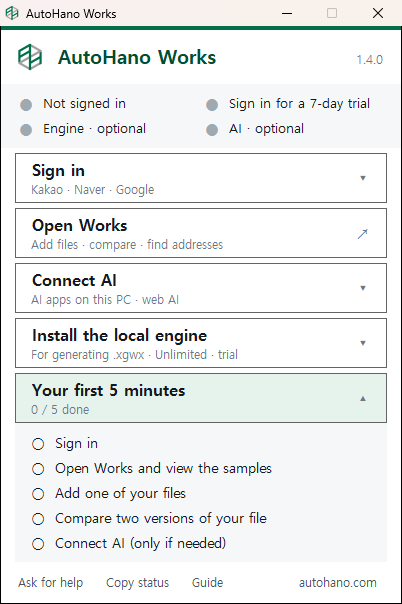
The launcher window opens
This small launcher window is where Works starts. Read it from the top: Sign in → Open Works → Connect AI → Install the local engine. Set up Connect AI and the local engine only when you need them — history, comparing and Find address need only a sign-in. Click Your first 5 minutes at the bottom for a checklist of things to try.
2. Sign in needed for the Free plan too
Use the same Google, Kakao or Naver account you used to download. Works does not store your password.
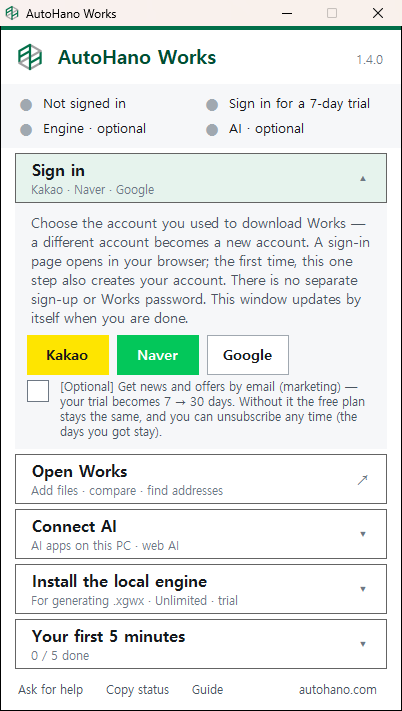
In the launcher window, Sign in → click your account
Choose the same account you chose when downloading.
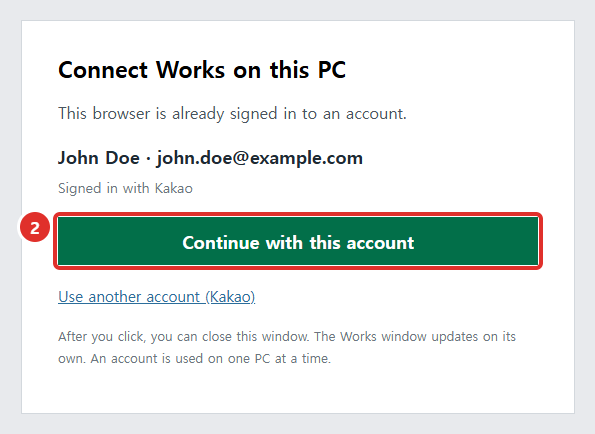
In the browser, Continue with this account
If this is the browser you signed in with when downloading, this page appears without signing in again. Check that the account is right and click — that is all. If a sign-in page you have not seen before appears, sign in as usual.
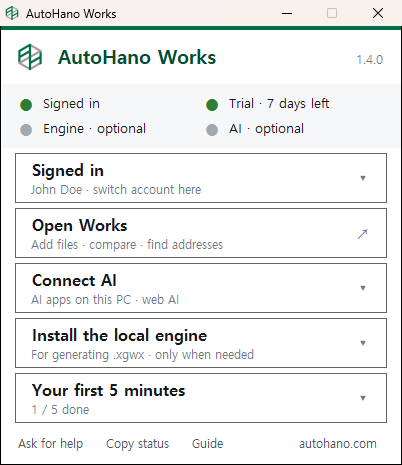
The launcher window updates by itself
When Signed in and Trial · 7 days left show green at the top, you are done. From your first sign-in you can use every feature for 7 days (30 days if you tick [Optional] Get news and offers by email when signing in).
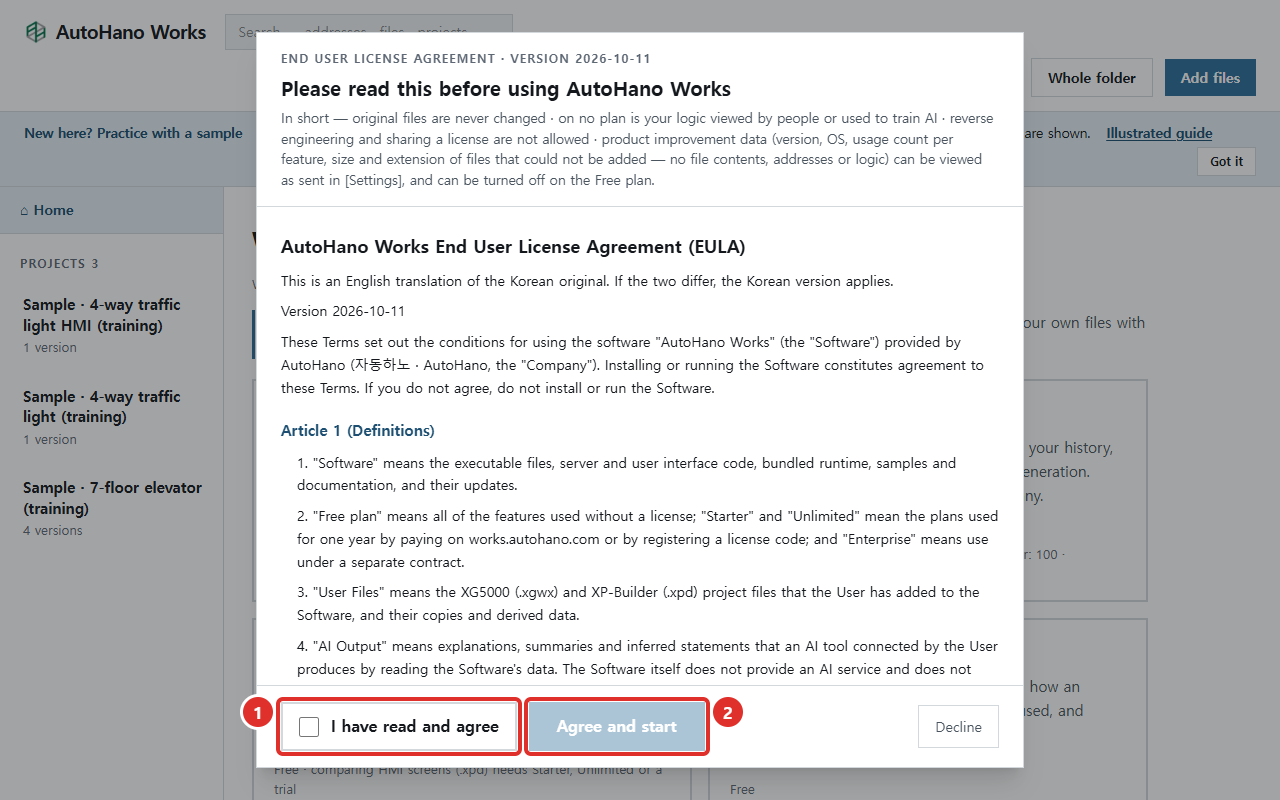
Open Works → agree to the terms
The main Works screen opens in your web browser. The terms window appears the first time only. ① Tick "I have read and agree" and ② click Agree and start.
A notice about the beta and plans may appear next. Read it and click Start.
3. 5-minute practice compare two versions of a sample and make a report
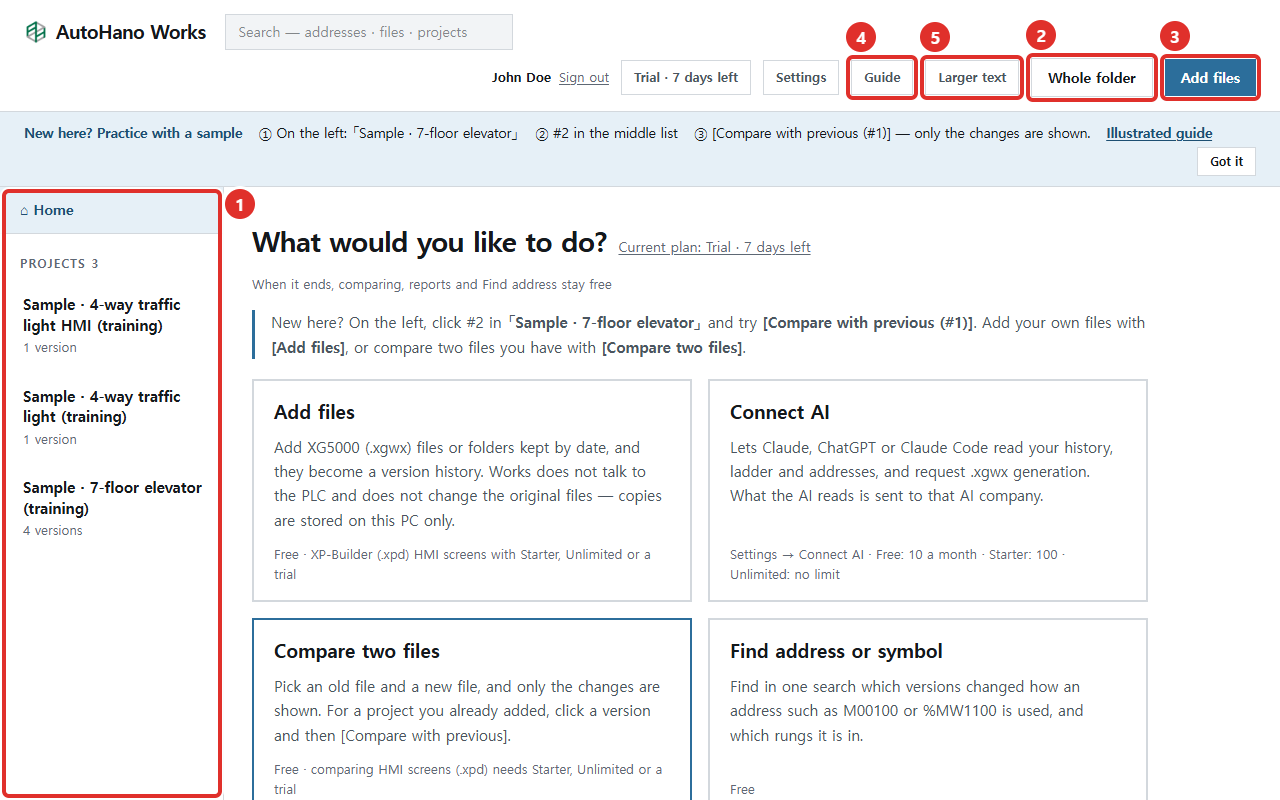
The first time you open Works, it has 3 sample projects for practice. Look at the layout of the screen first, then try one comparison with a sample.
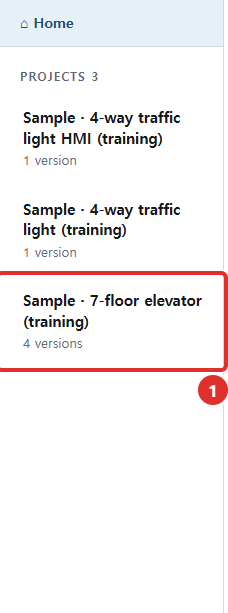
On the left, click Sample · 7-floor elevator (training)
In the middle list, click the date of #2
The middle column is the version list. The date is the one in the file name, or the day the file was added if its name has no date. The longer the bar, the more that version changed. Black is changed, blue is added and red is removed (rungs and ST lines). The color legend is above the list.
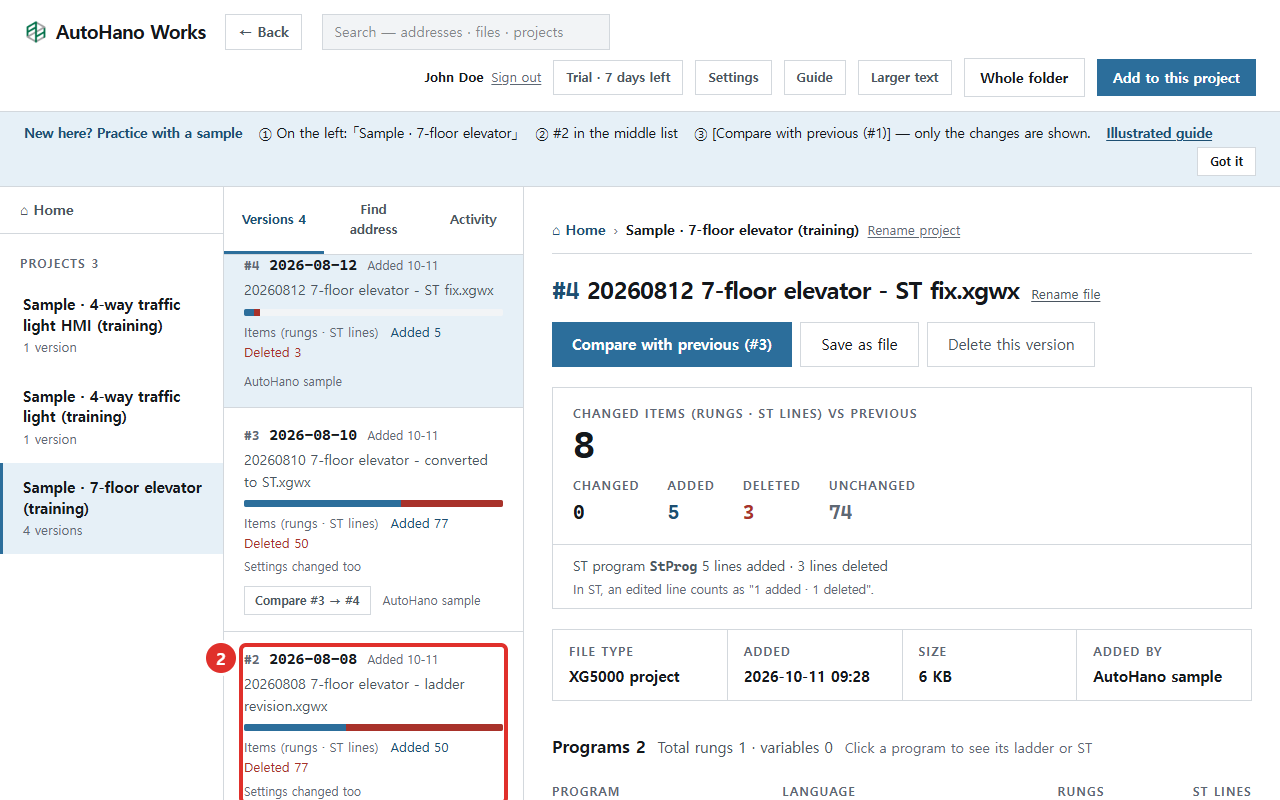
Click Compare with previous (#1)
The number in parentheses is the number of the version just before. The box below also shows how many items differ from the previous version.
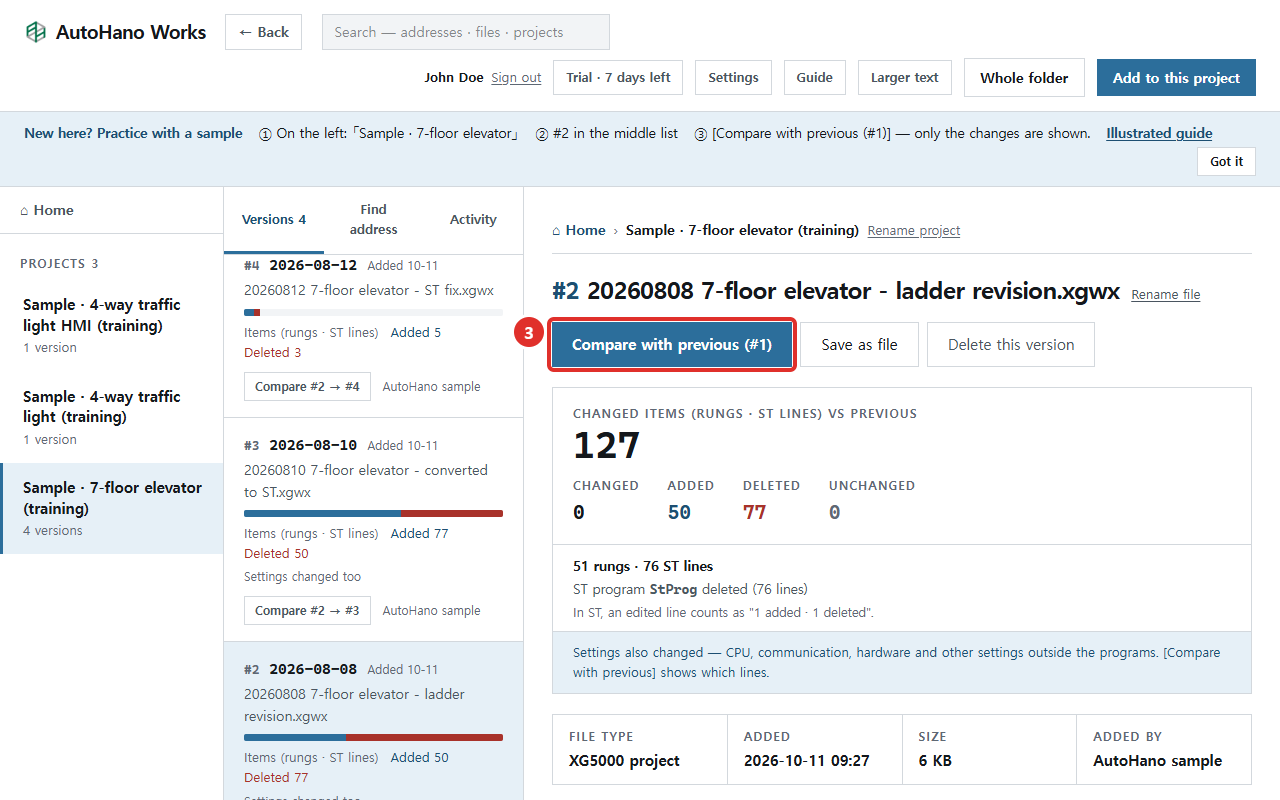
Only the changes are shown
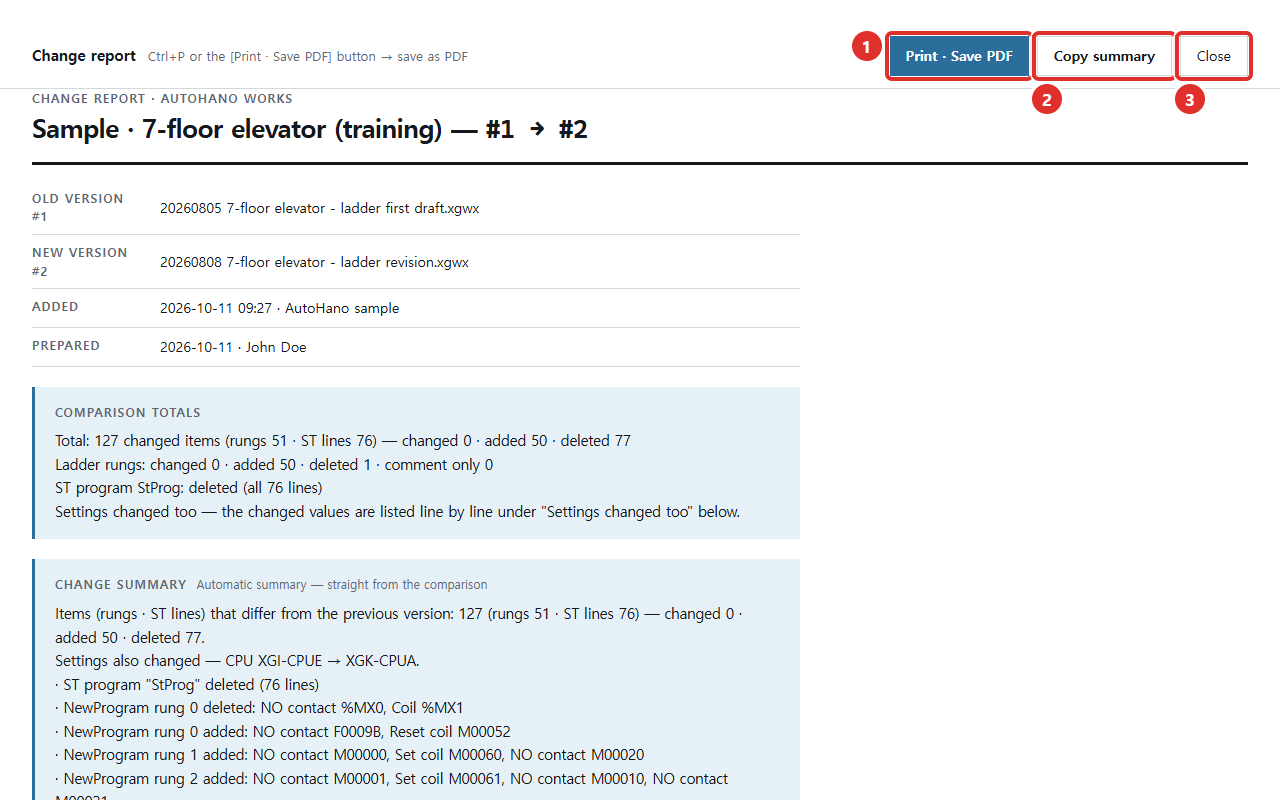
Only the rungs that differ between the two versions are gathered and shown; unchanged rungs are folded. The big number is the total of changed rungs and ST lines; right below, it is split into rungs and ST lines (in ST, an edited line counts as "added 1 · deleted 1"). Summarize in words writes the changes up as sentences — no AI is used. If settings outside the programs changed, such as CPU or communication settings, they are listed line by line under Settings changed too (red − is the old value, blue + the new version). For a document, click Report (print · copy).
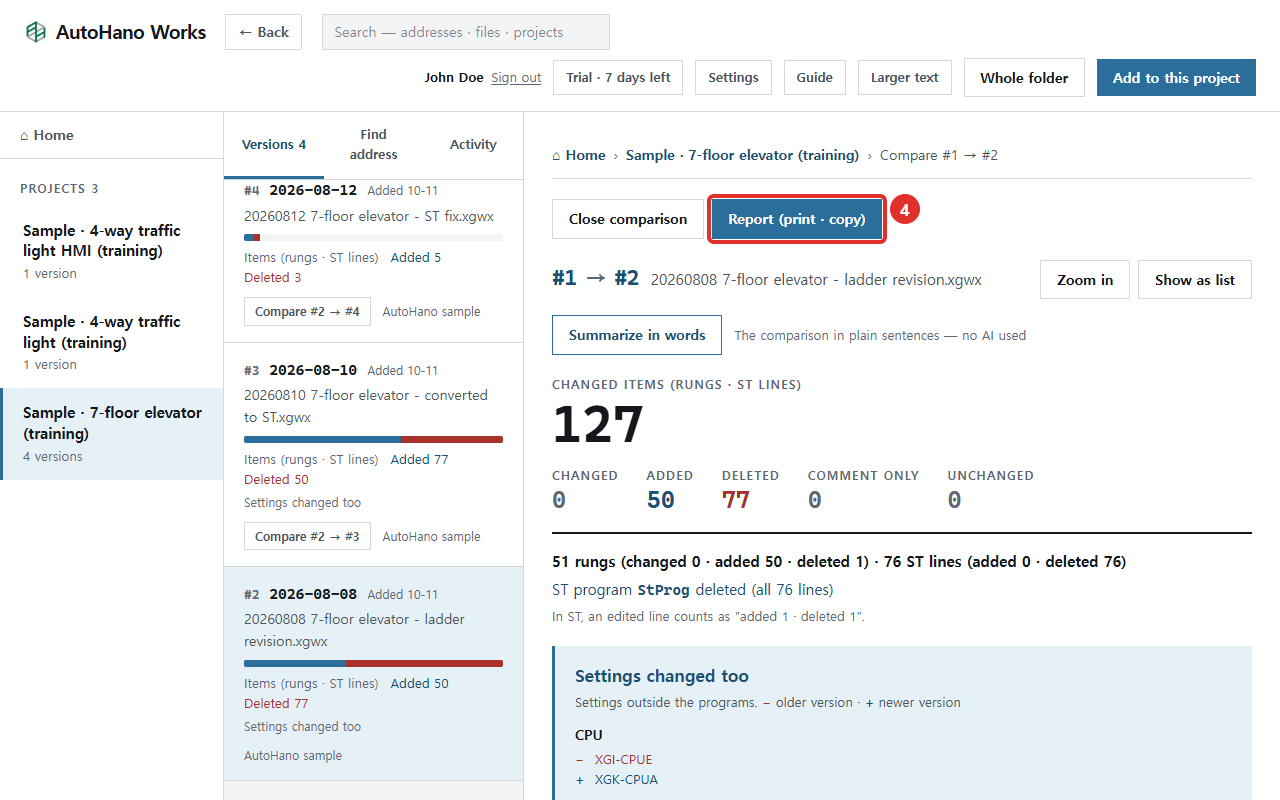
Report — print or copy
① Print · Save PDF keeps it on paper or as a PDF. ② Click Copy summary and paste it into a message or email to share what changed as text. ③ Close takes you back.
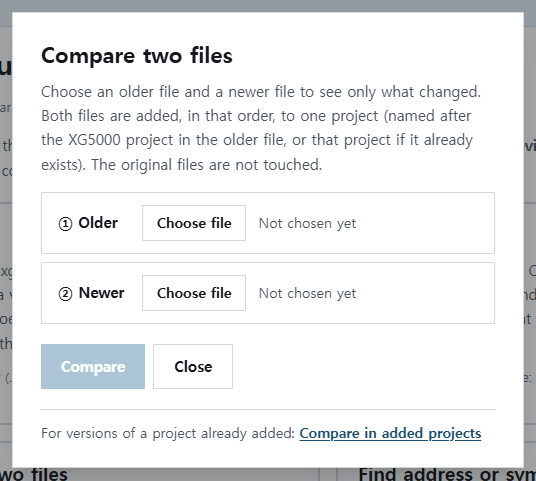
To compare just two files you have — Compare two files
On the home screen, open Compare two files, choose ① the older file and ② the newer file, and click Compare. Both files are added in order to one project (named after the XG5000 project name inside the older file, or that project if it already exists) — the original files stay as they are — and the comparison opens right away.
4. Add your files
Add XG5000 files (.xgwx) and XP-Builder HMI files (.xpd) and they become a version history. Works does not communicate with PLCs and does not change your original files — copies are stored on this PC only.
Click ② Add files and choose files
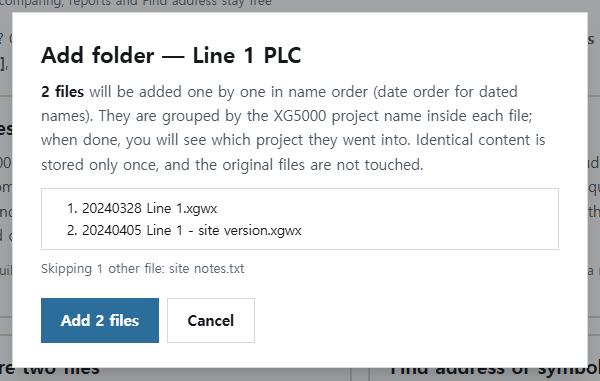
You can choose several files at once. If you keep dated files together in a folder, click ① Whole folder and choose that folder. Works first shows the files it found and the order it will add them in; nothing is added until you click Add N files. You can also drag files onto the screen. While a project is open, the button changes to Add to this project and adds the files to that project.

Choosing a folder shows a preview first
It shows how many files will be added and in what order (date order for dated names), and where they go (the open project, or else the XG5000 project name inside each file). When adding is done, a notice tells you which project they went into. If it looks right, click Add N files; if not, click Cancel. Files other than .xgwx, .xpd and .zip are skipped.
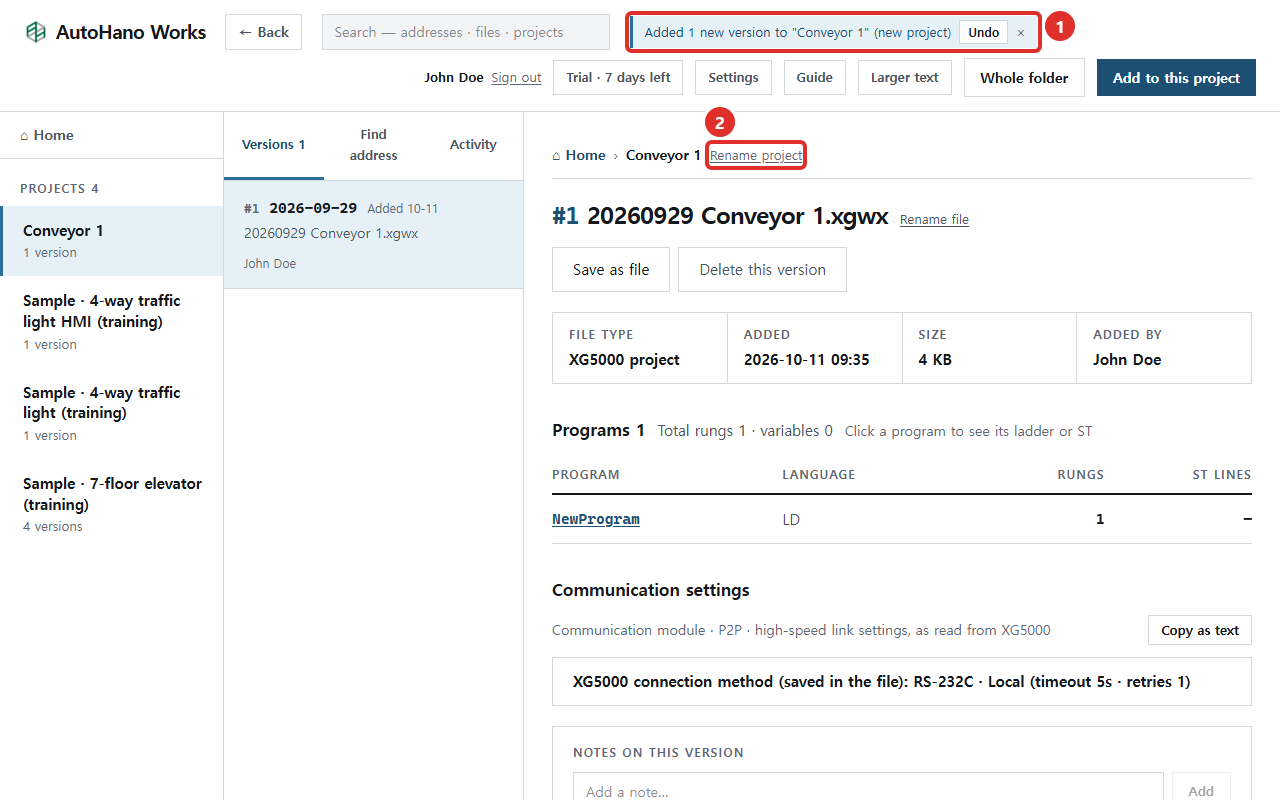
Done when you see: Added 1 new version to "Project name" (new project)
The project appears in the list on the left. At first it is named after the project name set in XG5000. If that is hard to recognize, click ② Rename project.
Rename
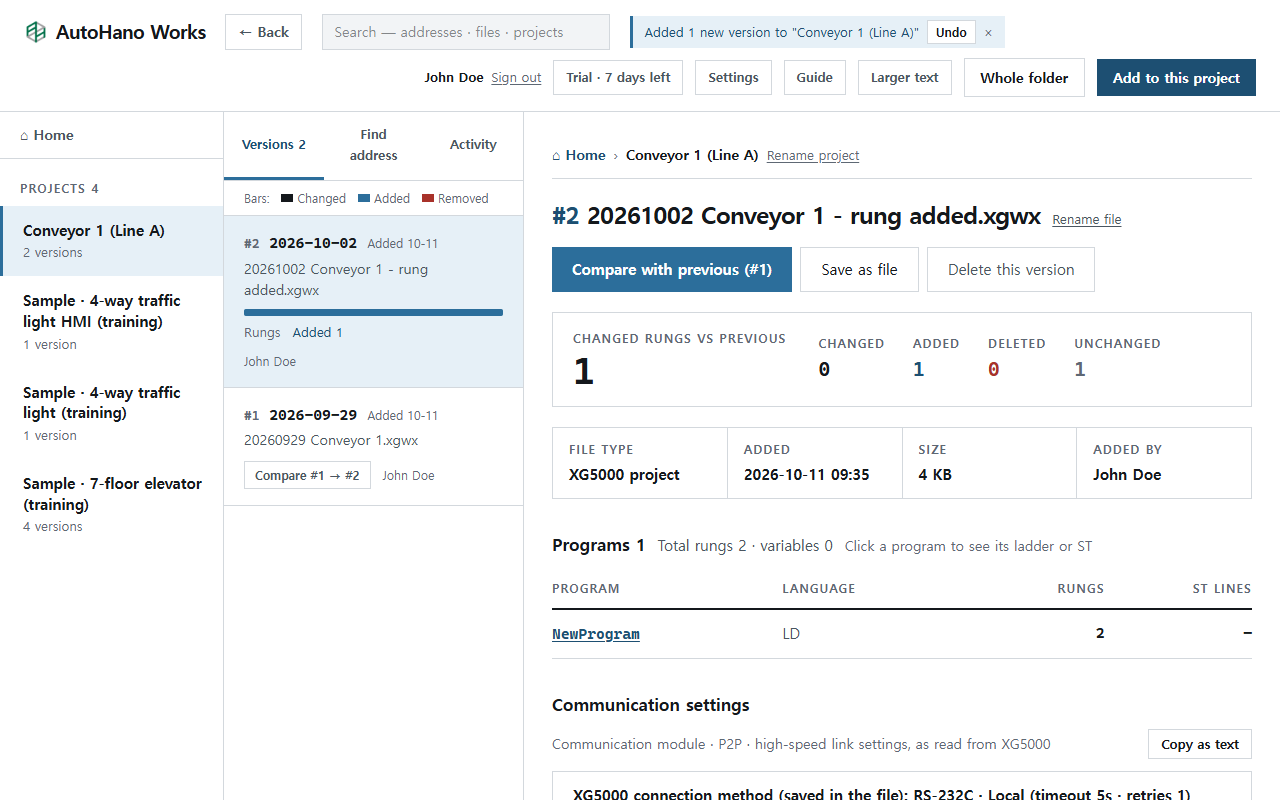
① Type a new name and ② click Save. After renaming, new files of the same project still go into this project.

Add an edited file again and it becomes #2, #3 …
Add a file edited on site and it goes into the same project as the next number. Then, as in the practice, click the date and click Compare with previous.
· If you add a file with the same content again, nothing new is stored; Works says "Already added — same content" and shows that version.
· If file names start with a date (for example 20260929 Line 1.xgwx), several files added at once are stacked in date order.
· If you added something by mistake, click Undo in the notice at the top, or Delete this version on that version. The original file stays as it is, and you can restore the version from the trash at the bottom of the version list within 30 days.
· If you need a version's file, click Save as file on that version's screen — it only saves to your PC and does not send anything to the PLC.
· If a file went into the wrong project, move it with Move to another project at the bottom of that version's screen.
· HMI (.xpd) files are a Starter and Unlimited plan feature. They work during the trial.
5. Find address · ladder view
Answer "Where is this address used?" and "Since when has it changed?" in one search.
Type an address in the search box at the top and press Enter
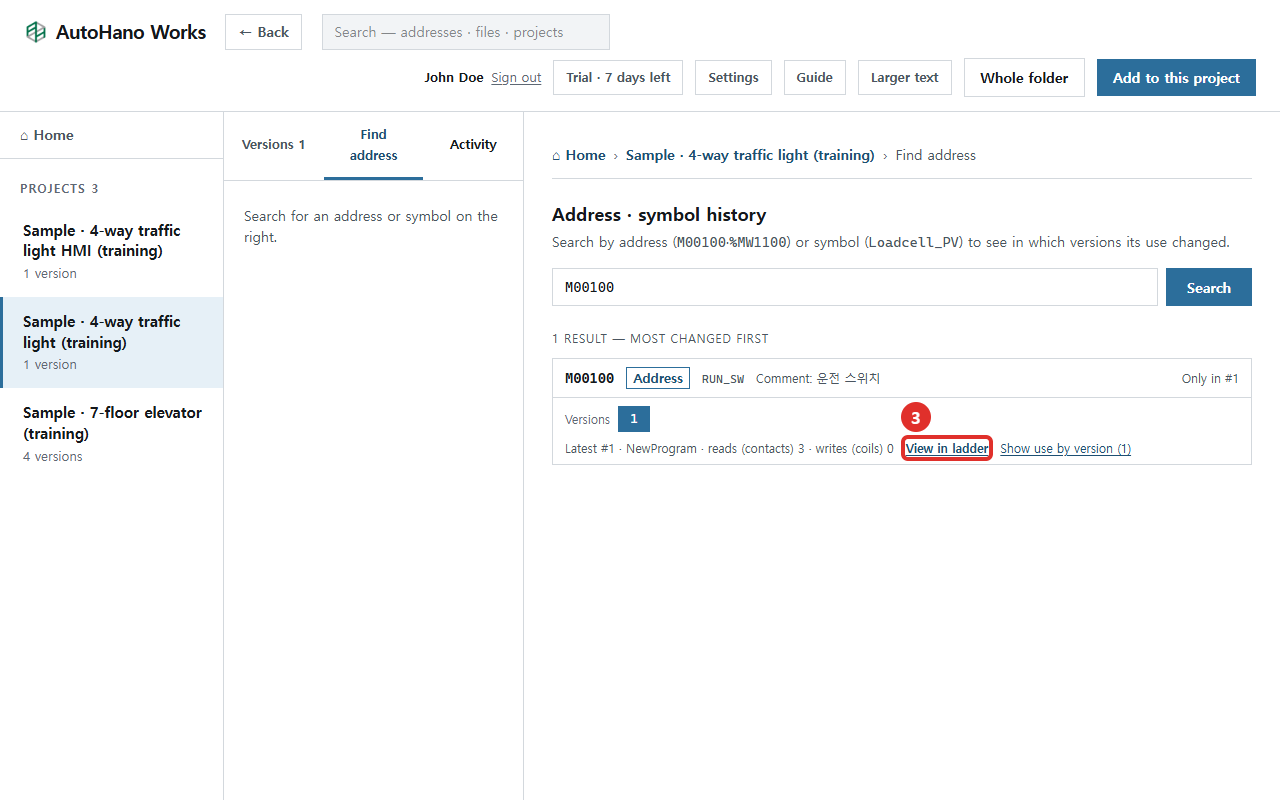
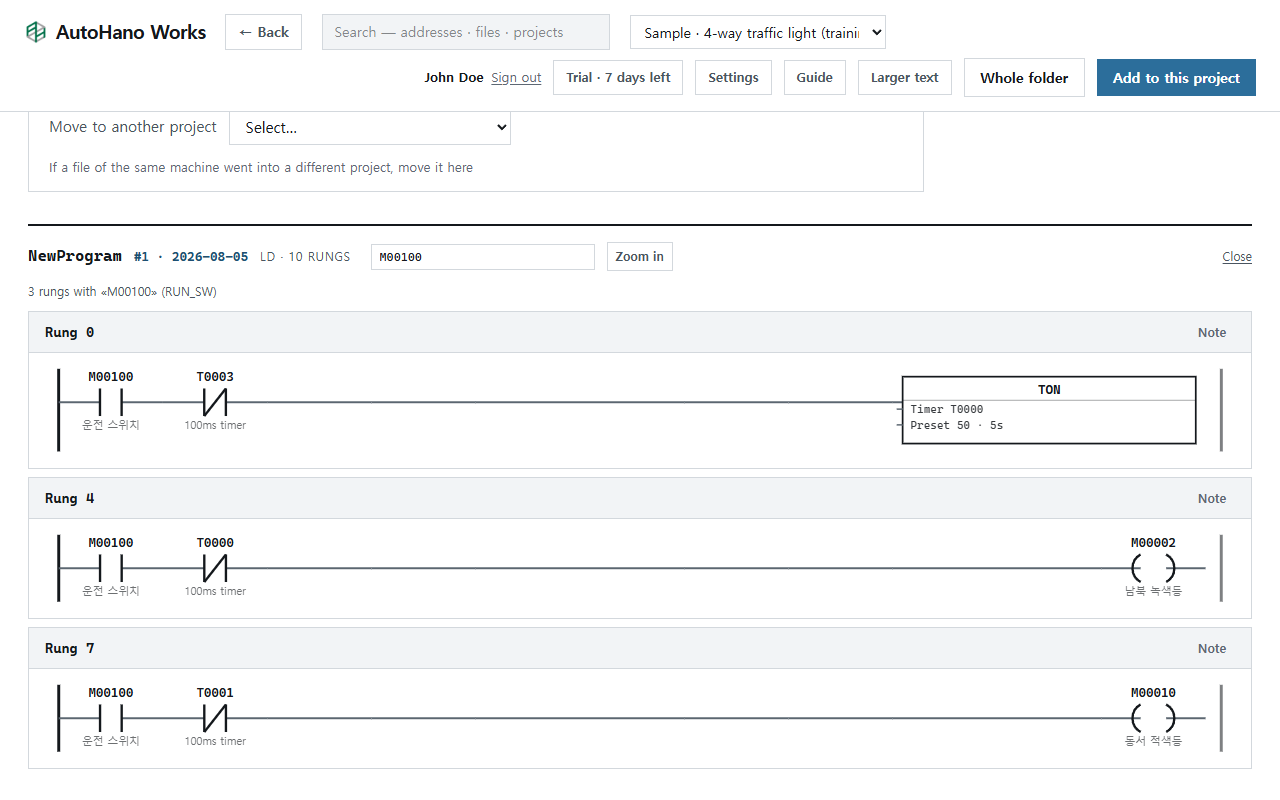
① Click the search box and type an address. To try it with a sample, type M00100 (the run switch in the 4-way traffic light sample). Write addresses as XG5000 shows them — P0001A or M00100 for XGK and XGB, %IX0.0.2 or %MX160 for XGI and XGR. You can also search by symbol name or comment text. ② Click the result.

Where the address is used is shown by version
It shows which versions have it, such as "In #1–#4 · use changed in 1 version", and how many reads (contacts) and writes (coils) the latest version has. The numbered boxes are versions; dark boxes are versions where it first appears or its use changed. Click ③ View in ladder to open the ladder showing only the rungs that contain that address. Contacts written with a symbol name (for example RUN_SW) are found too.
View the whole ladder
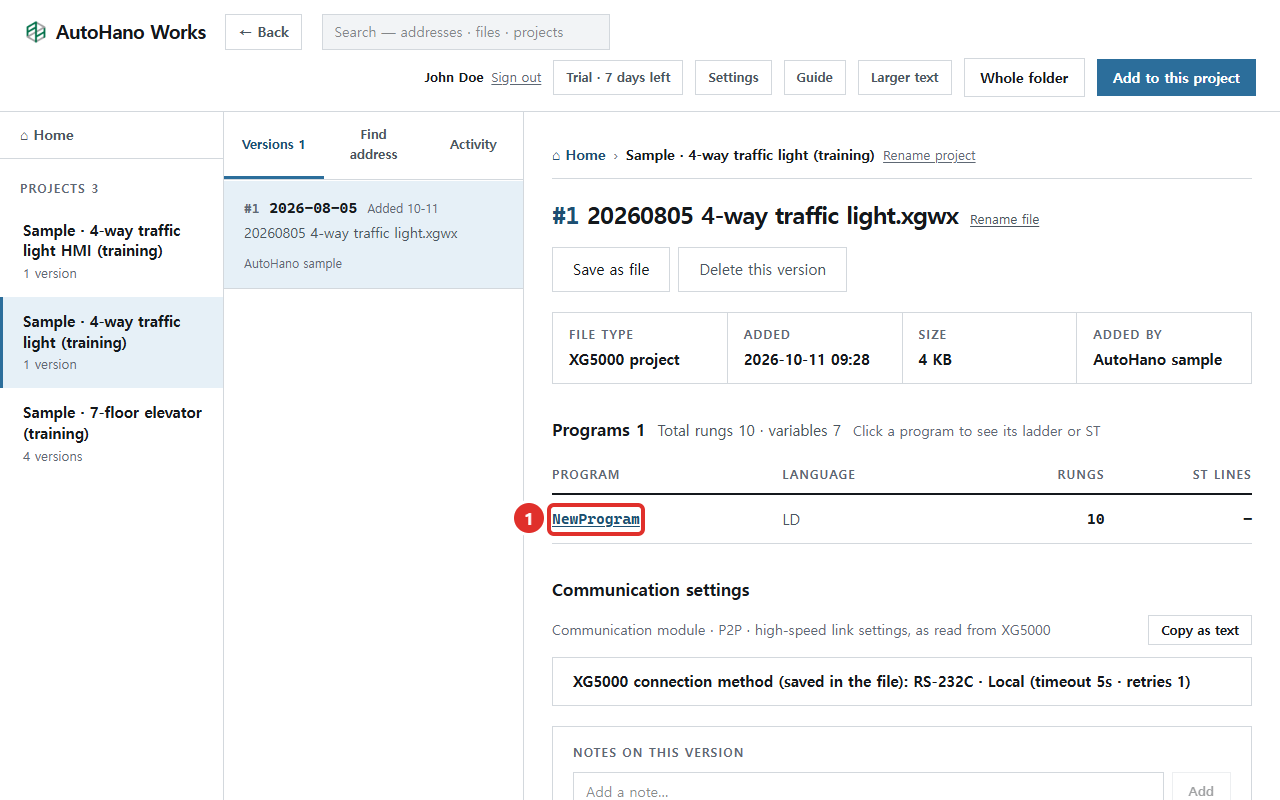
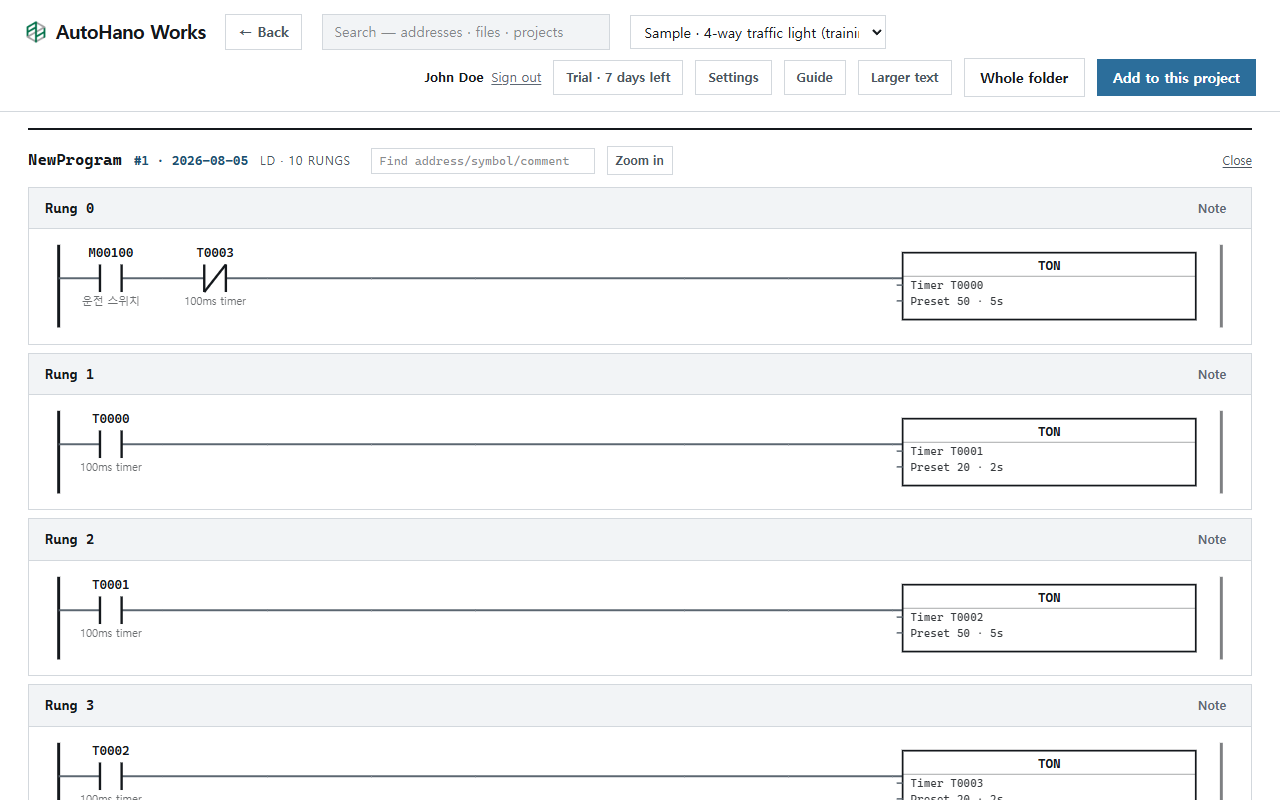
Click a program name on the version screen (for example NewProgram) and its ladder is drawn. Below contacts and coils you see the comments from XG5000's variable/comment table. XGK timers show like Timer T0000 · Preset 50 · 5s.
View communication settings
Below the program list, the Communication settings box shows the settings saved in the file, with XG5000's own names: Cnet (RS-485 speed, station number, operating mode), FEnet (IP, server mode), P2P (who exchanges which addresses — such as 0x40100 → D00100), high-speed link, and how a PC connects.
Click Copy as text and you can paste it as it is into a report or message.
6. Connect AI ask Claude · ChatGPT
There is no AI inside Works. Instead, you connect the AI you already use (Claude, ChatGPT) so it can read Works. The AI is billed by your own AI plan; Works charges nothing for AI.
If Claude Desktop is on this PC — one button
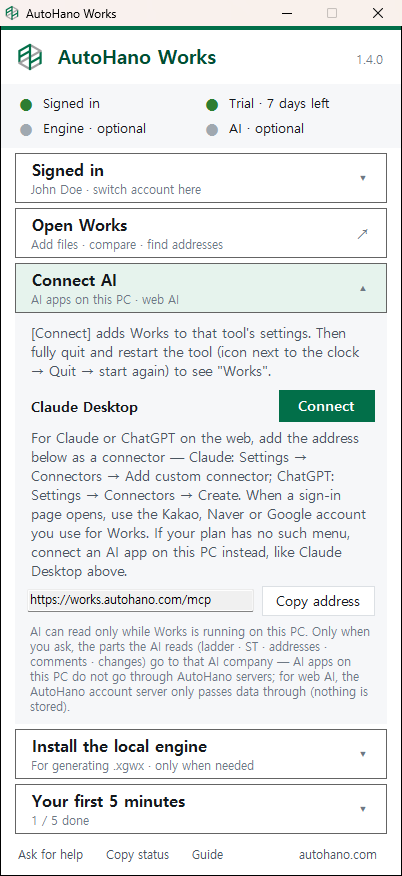
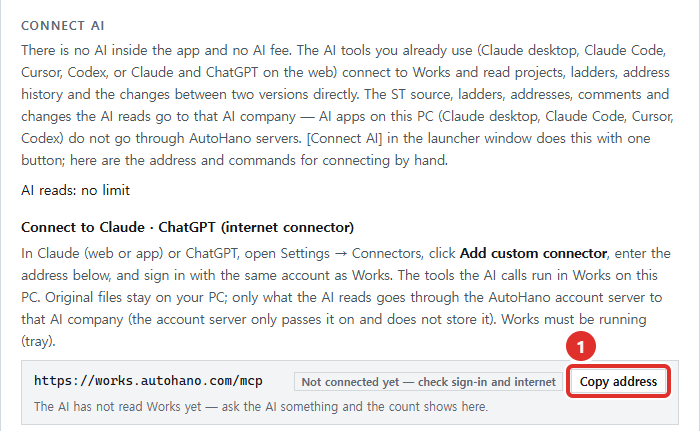
In the launcher window, click Connect AI, and next to Claude Desktop click Connect.
If you do not have Claude Desktop yet, go to claude.ai/download in your browser, download and install the Windows version, and sign in with your Claude account. Then expand Connect AI in the launcher window again — the Connect button is there now.
Quit Claude Desktop completely and start it again
Quit it including the Claude icon in the notification area next to the clock, then start it again. Works then appears in Claude's tool list. Until then the launcher window shows a yellow AI · restart the tool; once the AI reads Works for the first time, it turns into a green AI connected.
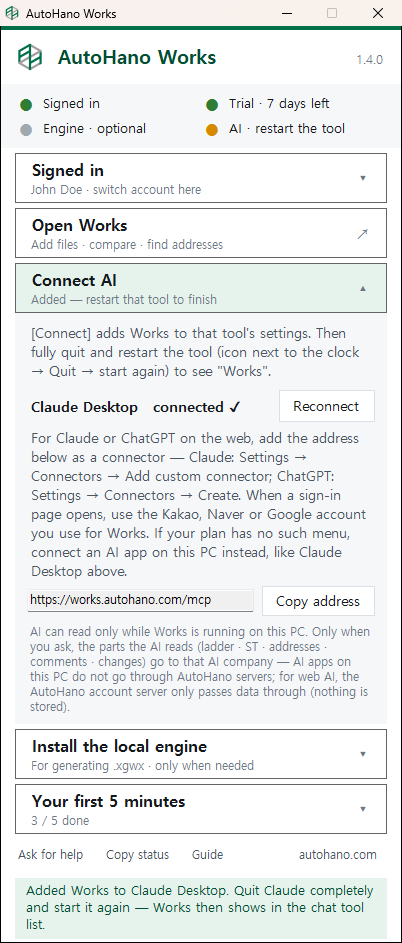
To use Claude or ChatGPT in the browser — paste the address
In Works, go to Settings → Connect AI and click ① Copy address. The address is https://works.autohano.com/mcp.
In Claude (web or app), go to Settings → Connectors → Add custom connector; in ChatGPT, go to Settings → Connectors → Create. Paste the copied address there, and when a sign-in window opens, sign in with the Google, Kakao or Naver account you use for Works. Depending on your AI plan, this menu may not be there — then connect an AI app on this PC as in step 1. Either way, Works must be running on this PC for the AI to read it.
Try asking
You can try these right away with the samples. Type them as they are.
- Show me the list of projects in Works
- In the 7-floor elevator sample, explain simply what changed between #1 and #2
- Find where M00100 is used in the 4-way traffic light sample
- Explain what the first rung of the 4-way traffic light sample means
- Organize the variables of the 4-way traffic light sample
- Make conveyor ladder logic with run and stop buttons for XGK-CPUA and check it with XG5000
For your own files, also tell the AI where the file is, and it adds the file to Works and reads it. The original file is not changed.
- Analyze D:\PLC\Line2.xgwx
- Check the servo sequence
- Organize the variables — and tell me which ones are unused or have no comment
- Summarize the communication settings — including the addresses exchanged with the inverter and HMI
- Also analyze the HMI file (.xpd) in the same folder
7. Generate .xgwx a real XG5000 creates and checks it
Give it a program (ladder instruction lines · ST · IL) and the XG5000 on this PC creates a project, runs the program check and returns it as a .xgwx file. The easiest way is to ask your AI to "make it and check it", but you can also enter the program yourself.
The first time — Install the local engine
Needed only to generate .xgwx files — not for comparing or Find address. In the launcher window, expand Install the local engine and click Install on this PC. It downloads about 1GB, needs 8GB of free disk space, and takes about 10 minutes the first time. After that, it is ready right away. It can be installed on the Unlimited plan and during the trial.
It copies the XG5000 installed on this PC for Works' own use — your installed XG5000 stays as it is. So installing XG5000 first is the easiest way — Open in XG5000, which opens a generated file right away, also uses the XG5000 on this PC.
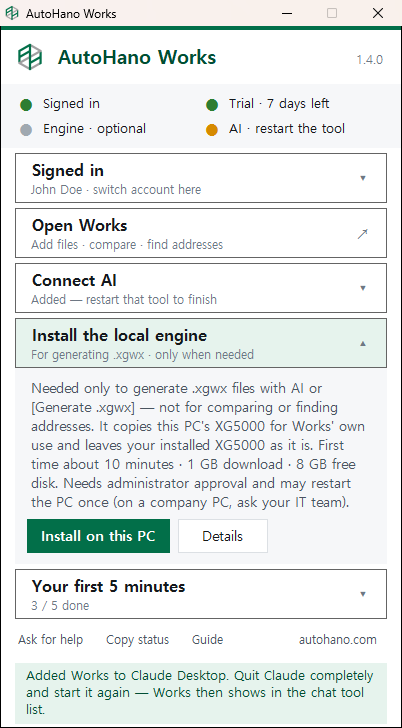
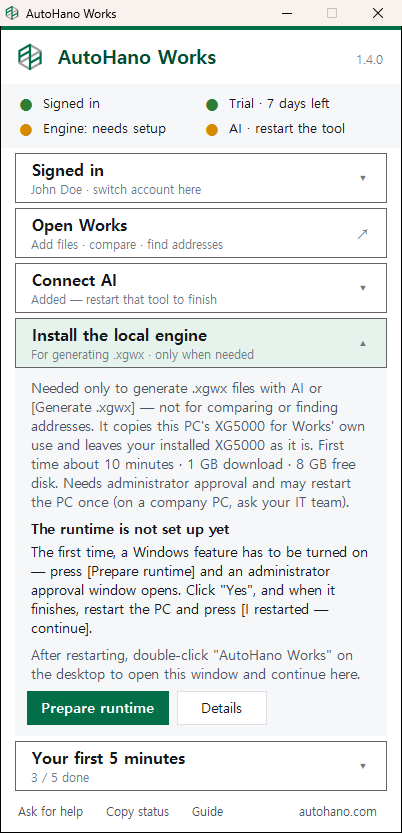
On a new PC — three places where the install stops
On a new PC, the install stops at the points below and tells you what to do. Click the green button shown in the launcher window.
"The runtime is not set up yet" → Prepare runtime → Yes in the administrator approval window (User Account Control) → when it is prepared, restart the PC → double-click AutoHano Works on the desktop, and the launcher window opens with this section expanded → I restarted — continue.
"XG5000 is not installed on this PC" → Choose the XG5000 installer → choose the XG5000 installer downloaded from the LS ELECTRIC website (XG5000_V….exe or the downloaded zip), and the rest installs by itself.
"Cannot start the virtual machine" → first restart the PC and click I restarted — continue. If it still fails, virtualization (Intel VT-x / AMD SVM) must be turned on in the BIOS. This is the one step the program cannot do for you — search for your PC maker's name and "enable virtualization in BIOS", or on a company PC, ask your IT team.
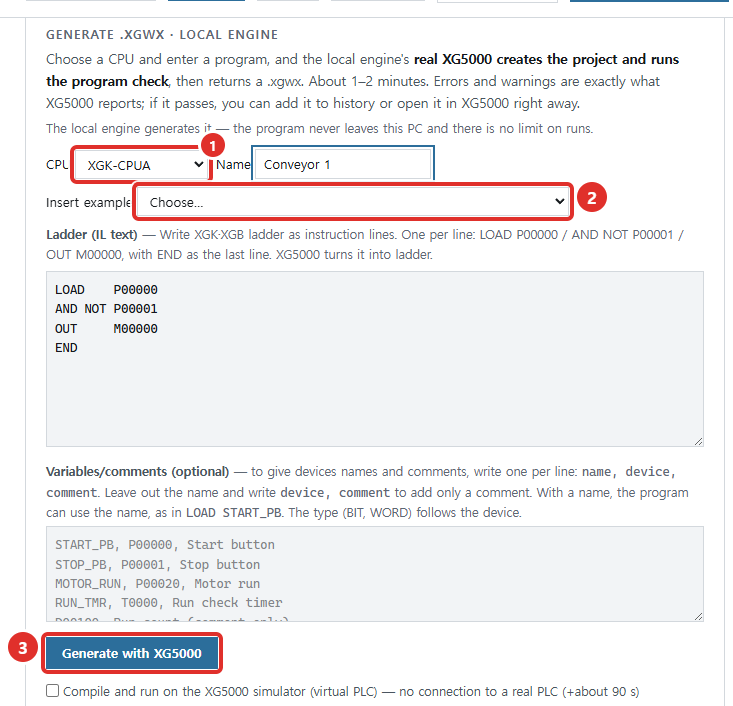
Settings → Generate .xgwx → choose a CPU and generate
① Choose a CPU and ② pick an example under Insert example. When the program box is filled in, click ③ Generate with XG5000.
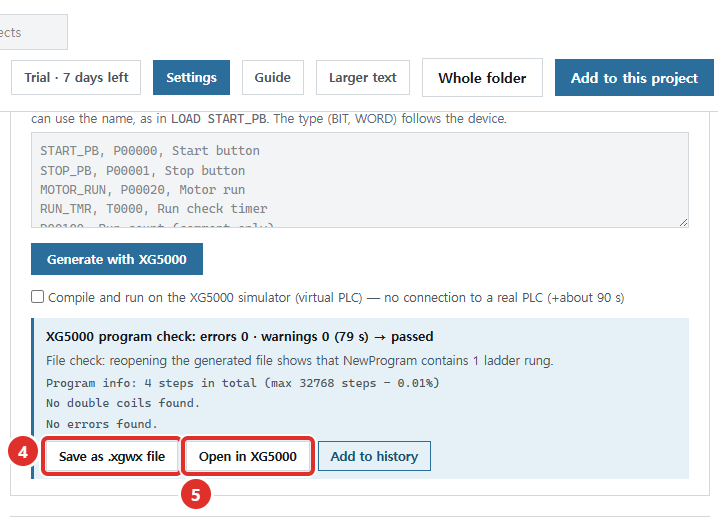
The result in 1–2 minutes — errors and warnings exactly as XG5000 reports them
If it passes, save it to your PC with ④ Save as .xgwx file or open it right away with ⑤ Open in XG5000. Add to history also keeps it as a Works project (under the name in the Name box — if a project with that name exists, it is added there as the next version). Turn on Compile and run on the XG5000 simulator (virtual PLC) to also compile and run it on a virtual PLC, with no real PLC connected (about 90 seconds more). If there are errors, the line numbers and reasons are shown — fix them and click again.
The File check line below the result is what Works found when it reopened the generated file to make sure the program is really in it. For ST and IL it also checks that the program matches what you entered.
Among the warnings, a double coil warning means the same address is written in more than one place. It appears when ST writes the same output under different conditions, and it is fine if that is intended. To remove it, calculate the value that is set in several places in a local variable and write it to the address only once, at the end (%MW21 := T_MW21;) — the ST examples under Insert example are written this way and have no warnings.
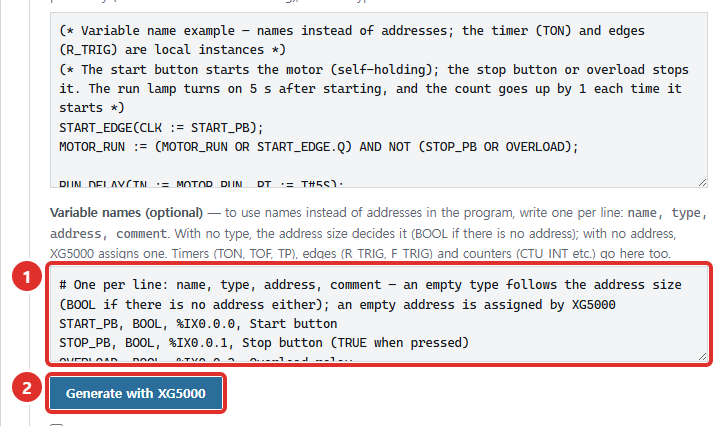
Names instead of addresses — Variable names (XGI · XGR · XGB IEC)
When you choose ST or IL, a ① Variable names box appears below the program box. Write one per line as name, type, address, comment, and they go into XG5000 as global variables and as the program's local variables, so the program can use names, such as START_PB instead of %IX0.0.0. Comments can be in English or Korean.
Leave the type empty and it follows the address size (BOOL if there is no address); leave the address empty and XG5000 assigns one. Timers (TON · TOF · TP), edges (R_TRIG · F_TRIG) and counters (CTU_INT etc. — writing CTU puts in CTU_INT) go here too, and the program uses them like RUN_DELAY(IN := MOTOR_RUN, PT := T#5S);. Under Insert example, pick Motor run · timer (variable names, XGI) and click ② Generate with XG5000.
The result, with the variables checked
The File check line shows how many variables went in with their names, types and addresses as written. Open the file in XG5000 and they appear exactly as written under Global/Direct Variables and under Local Variables of NewProgram.

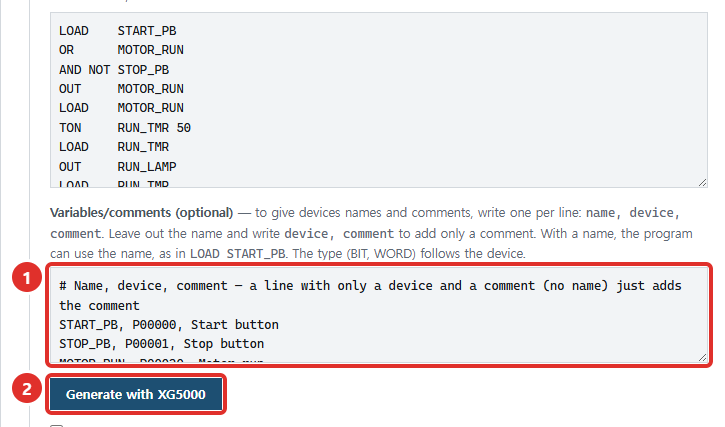
For ladder, names and comments on devices — Variables/comments (XGK · XGB)
When you choose a ladder CPU, a ① Variables/comments box appears. Write one per line as name, device, comment, and they go into XG5000's variable/comment table, so ladder lines can use names, such as LOAD START_PB. Leave out the name and write only device, comment to add just a comment to that device. Works decides the type, such as BIT or WORD, from the device.
On CPUs whose new projects already contain built-in I/O names (_00_IN00 …), such as XBC-ELC · XBMH · XBMHP, writing a name for the same device replaces it with your name. Writing only a comment keeps the original name and changes only the comment. Under Insert example, pick Ladder names · comments (variables/comments, XGB) and click ② Generate with XG5000.
The result, with the variables/comments checked
The File check line shows how many variable/comment lines (lines with a name · comment-only lines) went in with their names, devices and comments as written. Open the file in XG5000 and they appear exactly as written under Variable/Comment.

8. Plans
| Trial | From your first sign-in you can use every feature for 7 days. If you tick [Optional] Get news and offers by email when signing in (or turn it on later on the Plan screen), it is 30 days, and unsubscribing later does not shorten it. There is nothing to apply for. |
|---|---|
| Always free | PLC file (.xgwx) version history · comparing two versions · Find address · ladder view · reports · automatic backup · connecting AI (AI reads: 10 a month — one read is 30 minutes from the moment the AI first reads) |
| Starter (1 year) | HMI (.xpd) history and comparison · 100 AI reads a month · generating .xgwx (generation server) 10 a month |
| Unlimited (1 year) | Everything in Starter + unlimited AI reads · generating .xgwx with the local engine (no limit) · your company name and logo on reports. Prices are shown on the Plan screen. |
Open the Plan screen
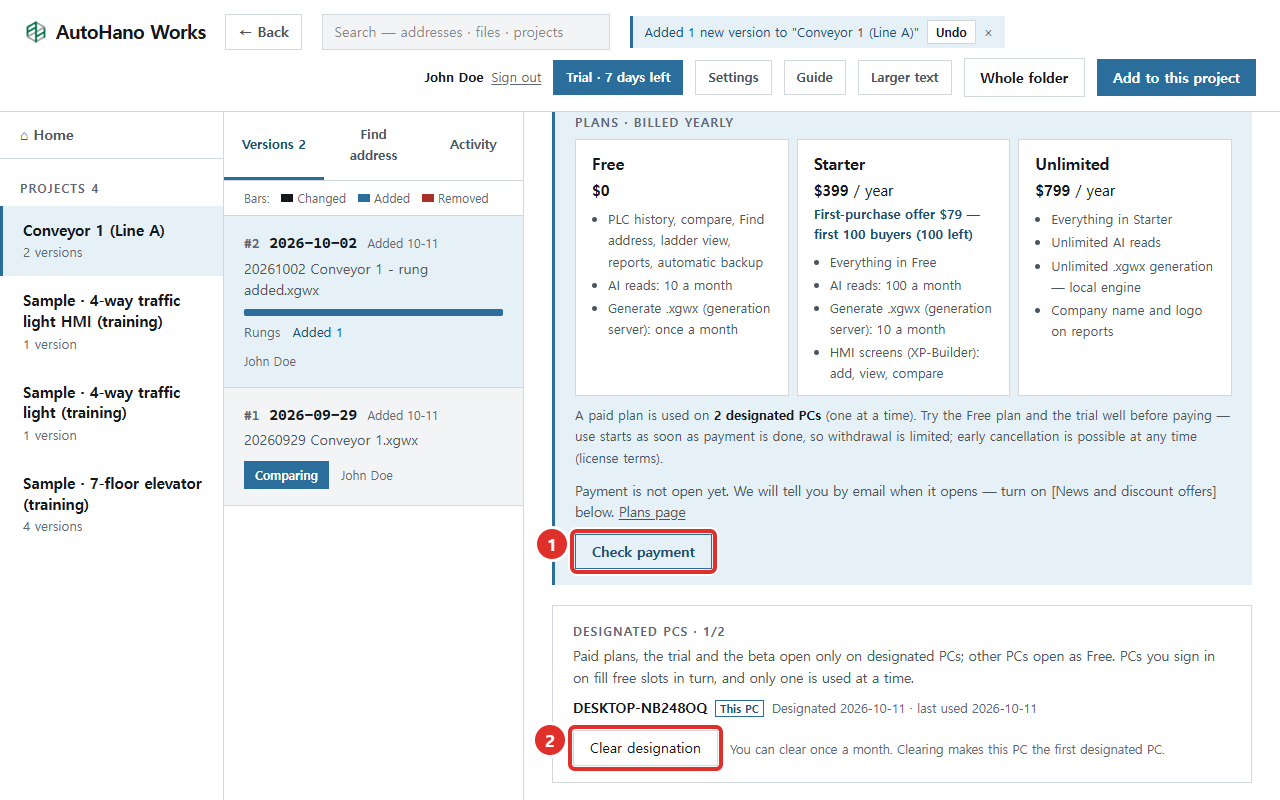
Click the Trial · 7 days left (or Free) button at the top of the main screen. It shows the Free, Starter and Unlimited plans and your designated PCs. Plans are paid yearly through works.autohano.com. Online checkout for customers outside Korea is coming soon — once it opens, Buy on the website opens the checkout page in your browser. Until then, a notice is shown in its place; turn on News and discount offers and we will tell you by email when it opens.
Check payment and designated PCs
When payment is complete, Works switches over by itself within an hour. To use it right away, click ① Check payment. Paid plans and the trial open on 2 designated PCs and are used on one PC at a time — the PCs you sign in on are designated in turn. If you changed PCs, click ② Clear designation and the current PC becomes designated (once a month). Payment history and cancellation are on this screen too, and a license code received under a company contract is entered with Add code below.
9. If you get stuck
- The main screen does not open
- Click the green AutoHano Works icon in the notification area next to the clock, then click Open Works in the launcher window. If there is no icon, double-click AutoHanoWorks.exe again.
- It is blocked on a company PC
- Security software often blocks programs it has not seen before. Ask your IT team to allow running the AutoHanoWorks folder. If the sign-in page does not open, also check that access to works.autohano.com is not blocked.
- The local engine install stopped
- Expand Install the local engine in the launcher window to see why it stopped and what to do. The three most common cases are in step 2 of chapter 7. If that does not help, click Details → Copy log (to ask an AI) and paste the log into the help email described below.
- How do I start over on a new PC?
- Follow this guide from chapter 1. Signing in with the same account signs out the PC you used before. A paid plan opens as it is once the new PC takes a designated PC slot; if the slots are full, clear the designations on the Plan screen (once a month). For a license code, add the same code again on the new PC (a code is for one person). Added files and history are stored on the PC you used before — to move them, let us know through the help request below.
- A file is not added
- The reason is shown in the red line at the top of the screen. Check that the file has been opened and saved in XG5000 or XP-Builder, and that no other program is using it.
- The text is too small
- Each click on Larger text at the top of the main screen makes it bigger (3 sizes). You can also hold Ctrl and turn the mouse wheel in the browser.
- I was signed out suddenly
- Signing in with the same account on another PC signs out the PC used before. Sign in again and your history is still there.
- Where are the added files stored?
- In a Works folder on this PC, backed up automatically once a day. Your original files are not touched. If you change PCs, let us know through the help request below.
- I need help
- Click Ask for help at the bottom of the launcher window and an email with your current status opens. Write a line or two about what is not working and send it. If no email program opens, click Copy status and paste it into an email to [email protected]. The status does not include file contents or passwords.
AutoHano Works · AutoHano · [email protected]
The pictures were taken with the training samples and an example name. Screens may differ slightly between versions.